🤖MemoDroid: How I Built a Smart Robotic Arm from Scratch While Studying and Working Full-Time
May 31, 2025
💡 Introduction – Turning Vision Into Action
MemoDroid started as a bold idea: Could I, as a single developer, design and build a fully functional robotic arm – complete with motion recording, Bluetooth control, a mobile interface, and smooth servo handling – in just a few weeks?
As a full-time computer science student balancing a packed academic semester and a demanding job, this wasn’t just a project. It was a test of focus, engineering, and willpower.
I took on this challenge as part of an IoT & Robotics course led by Dr. Yehuda Rosilho not knowing just how deep it would go. What followed was a true end-to-end engineering journey – every circuit, every line of code, every screw placed with intent and urgency.
Figure 1: MemoDroid Logo
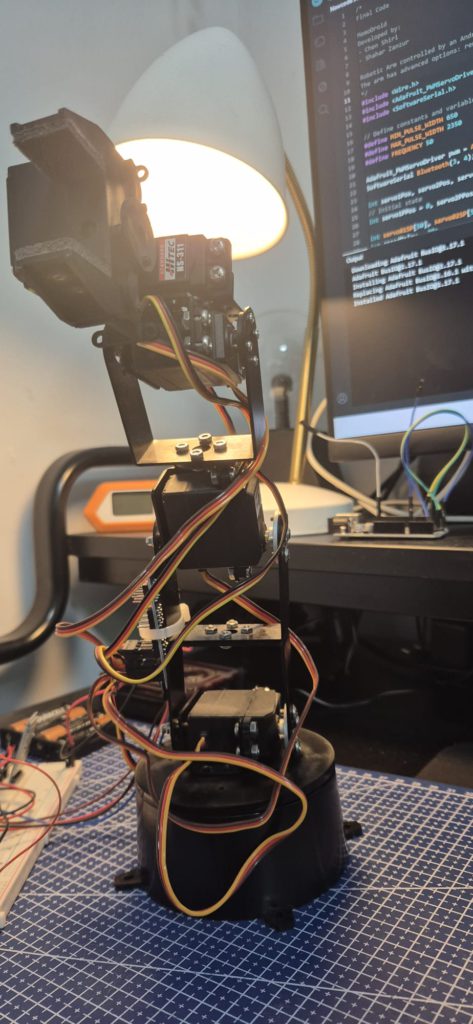
Figure 2: The completed MemoDroid robotic arm, fully built and tested.
📜 Goal & Core Idea
MemoDroid was designed to solve a real problem:
“Make it easy for anyone to automate small, repetitive tasks at home or work using a robotic arm.”
But beyond the functionality, I wanted to design something accessible. MemoDroid isn’t just a robotic arm – it’s an approach to democratize robotics.
🧰 Planning & Architecture
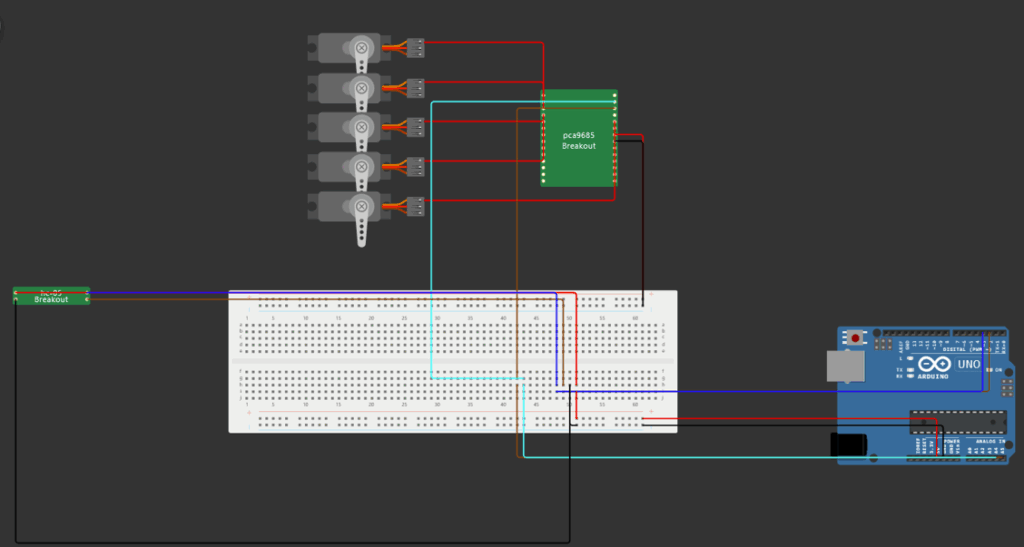
Figure 3: Custom electronic blueprint built manually using Wokwi-inspired layout. Includes 5 servos, Bluetooth module, PCA9685, and power circuit.
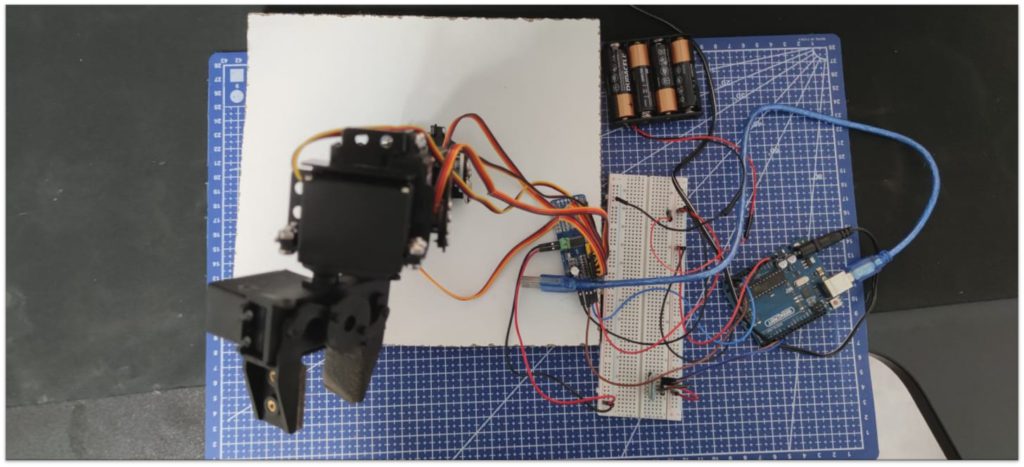
Figure 4: The implementation of the blueprint
🔨 Hardware Stack
Component
Description
Arduino Uno
Main microcontroller for servo control and logic
PCA9685
16-channel I²C PWM driver for precise motor control
6 Servos Total
5 standard + 1 continuous rotation
HC-05 Bluetooth Module
Wireless communication bridge with the mobile app
Breadboard + Jumpers
Prototyping and connection base
6V 2A External Power
Dedicated supply to stabilize servo load
➕ The Sixth Motor: 360° Servo
Halfway through the project, I added a 6th servo – the Hitec HSR-1425CR, a continuous rotation servo. Unlike the others, it doesn’t rely on angles – it uses PWM signal range to control speed and direction.
📲 Mobile Application
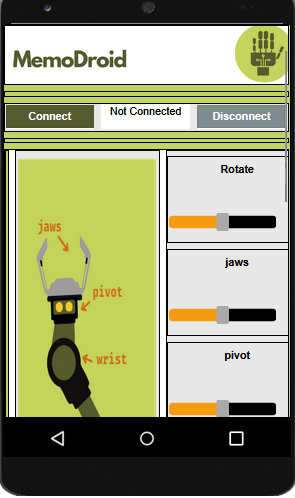
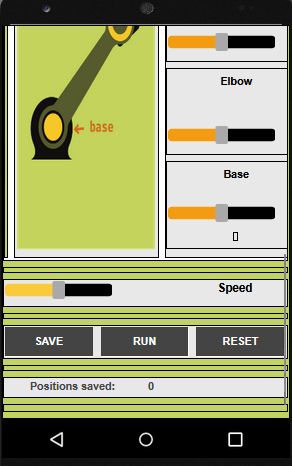
Figure 5: Screenshot 1 of the mobile app
Figure 6: Screenshot 2 of the mobile application
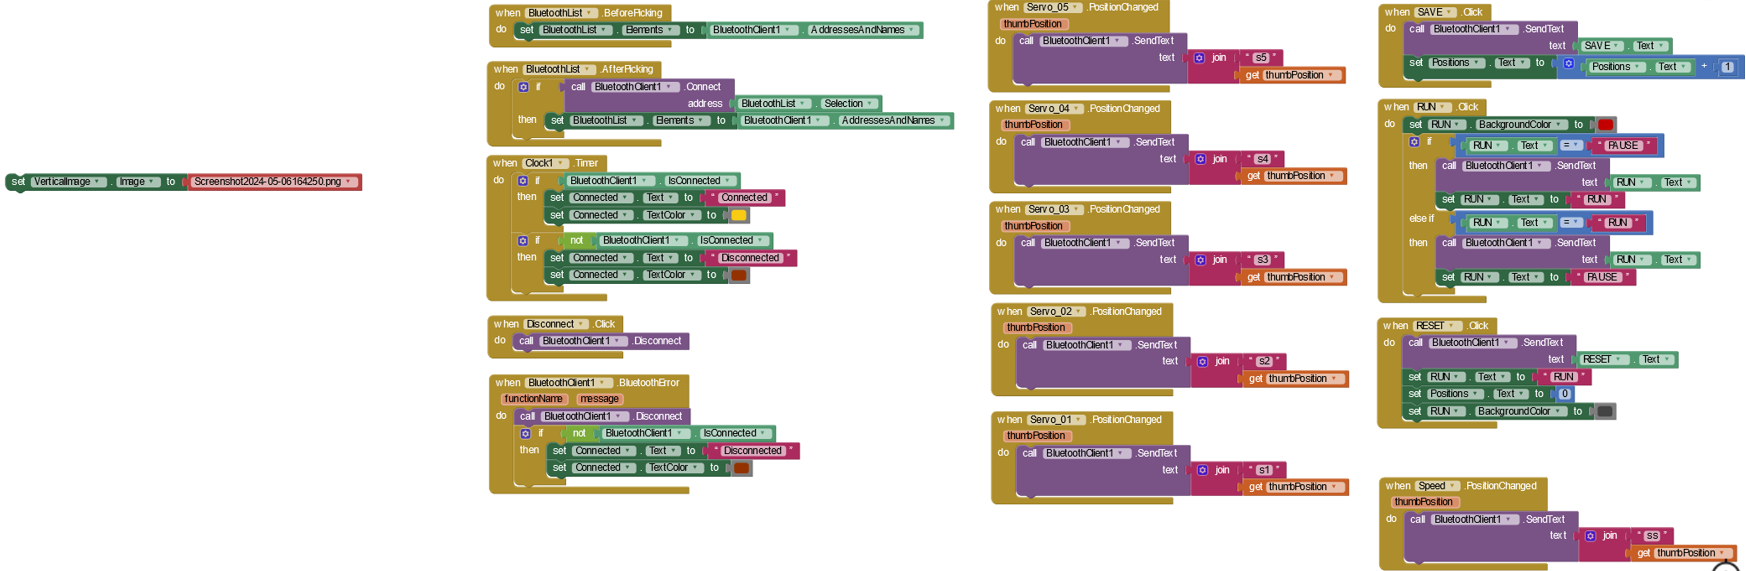
Figure 7: The main logic of the mobile application
🛠️ Implemented Functionalities in the Arm and App
🎮 Manual Control for Each Servo Real-time control via Bluetooth using commands s1 to s6. Supports both standard 180° servos and a continuous rotation servo (servo6).
💾 Save & Replay Movement Routines
SAVE: Stores the current position of all servos
RUN: Replays the saved sequence to automate tasks
⏱️ Custom Speed Control (Built from Scratch) Speed control is not provided by default in servo movement. I implemented a manual speed mechanism using delay injection between servo position updates. The delay can be adjusted dynamically via the ss<value> command to simulate different movement speeds.
📡 Reliable Bluetooth Command Parsing Developed a robust input buffer and parser to handle fragmented Bluetooth transmissions, ensuring commands are processed correctly even when split across multiple reads. Supported commands include:
RUN – Start executing saved routine
SAVE – Save current positions
PAUSE – Temporarily stop execution
RESET – Clear saved positions
Communication is done via custom serial protocol:
s1<angle>
s2<angle>
...
s6<mode> (1-5)
Each message is sent to the Arduino and interpreted by the core parser.
⚙️ Firmware & Control Logic
🌟 Command Handling
All servo commands are processed via handleCommand(), which intelligently reads commands like s2130 and moves the relevant motor.
For Servo 6:
s6<1–5> → mapped to:
1 = full reverse (0)
2 = slow reverse (45)
3 = stop (90)
4 = slow forward (135)
5 = full forward (180)
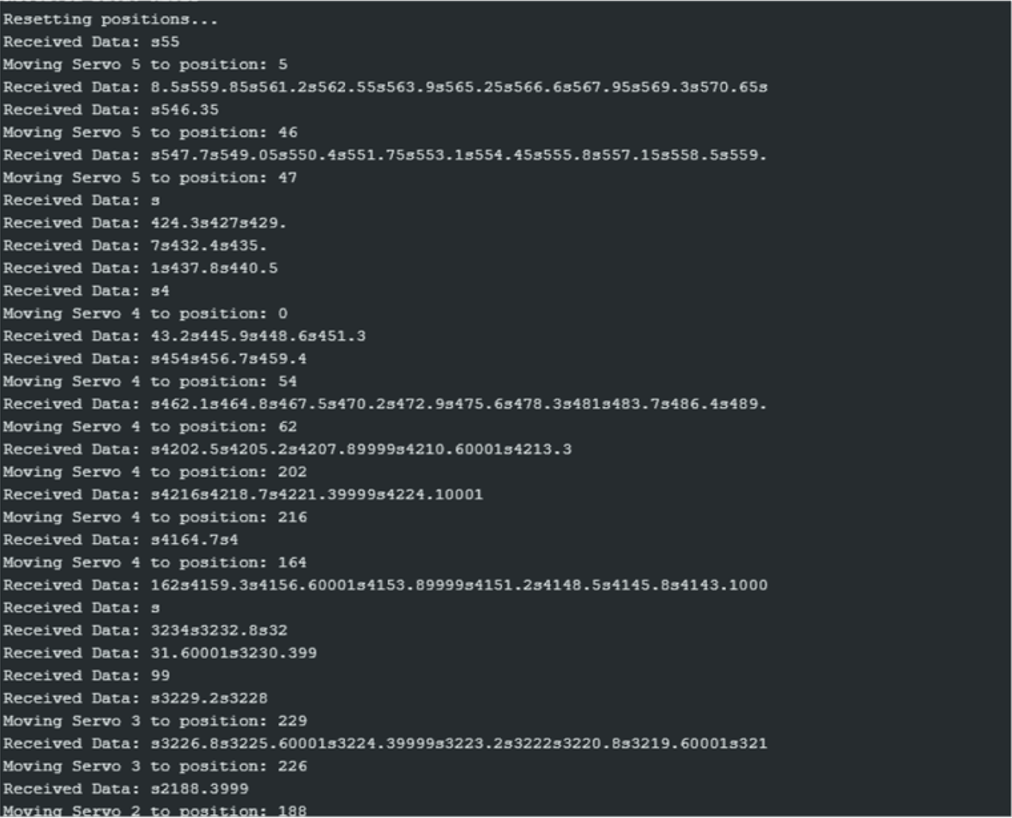
🧐 Buffered Bluetooth Parser
One of the hardest bugs I encountered was due to Bluetooth message fragmentation. Data arrived in pieces, like:
s3
1
80
This caused misfires and corrupted commands. To solve this:
I built a custom string buffer
Extracted complete commands using indexOf('s')
Deferred processing until a full command was available
Now the robot reads fragmented Bluetooth messages perfectly every time.
Figure 8: Creating my own data serialization for communication
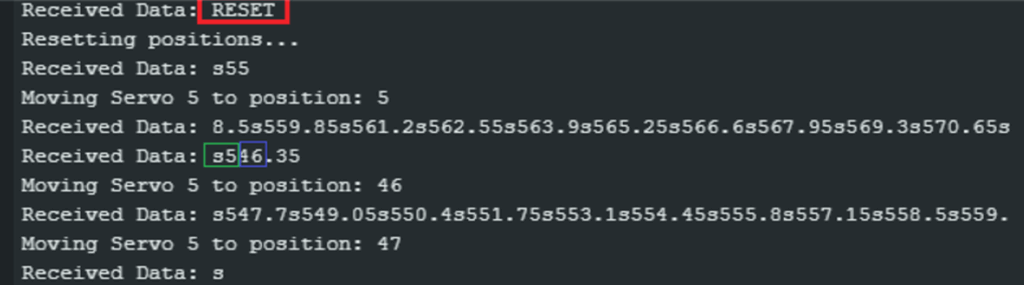
Figure 9: Serial Monitor output showing commands
🧪 Calibration & Testing
I implemented a TestCalibration() routine and spent hours adjusting and observing each servo to get ranges right:
Servo 1: 0-45°
Servo 2: 100-130°
Servo 3: 150-270°
Servo 4: 0-270°
Servo 5: 45-180°
Servo 6: 1-5 (mapped to continuous rotation behavior)
This fine-tuning ensured that MemoDroid behaves like a real robotic system, not a toy.
⚠️ Roadblocks I Overcame
🛡️ Obstacle
🛠️ Solution
Motors jittering from insufficient power
Switched to 6V 2A external supply
No PCA9685 or HC-05 parts in simulator
Manually designed the full electronic scheme
Bluetooth messages broken mid-stream
Built a custom buffered parser
Complex calibration ranges
Developed test functions + manual tuning
Debugging during silent failures
Added real-time Serial Monitor logs
✅ Results & Capabilities
Built a functional robotic arm from scratch
Added 360° motor support
Built a mobile controller from scratch
Implemented data recording and replay
Created a stable custom communication protocol
Made everything intuitive and modular
💻 Technical Architecture Snapshot
[Mobile App] → Bluetooth → HC-05 → Arduino Uno
                              ↓
          Command Parser & Logic Handler
                              ↓
       PWM via PCA9685 → Servo Motors (1–6)
In future releases, I’d like to expand MemoDroid with:
☑️ Cloud scheduling + remote logging
🧠 Computer vision for object detection
🕹️ Joystick or gesture control
🌐 Web interface for control from any device
🧐 Reflections
MemoDroid was a passion project I brought to life from the ground up – writing the code, designing the circuits, building the app, and refining every detail.
This project taught me:
That debugging hardware is 10x harder than software
Why protocols and parsing matter
And most importantly: with enough focus, you can do more than people expect – even alone
Figure 10: Version 1 of the robotic arm
🙏 Final Thoughts
MemoDroid isn’t just a robot. It’s a personal victory. A product of discipline, late nights, self-learning, and never giving up.
“You don’t need a team of engineers or unlimited time. Just a clear goal, smart planning, and the will to execute.”